Sunday, 20 January 2013

Snowed in

So 3 days ago the Snow God sneezed and I've been stuck in the Week Day Home all weekend.  For 24 hours the roads on my hill were officially closed by the police so I couldn't get out of town which meant no Country House with Himself and the Boys or sledging and igloo building for me. Here in the UK we behave as if we are the only country dealing with the current snowfall and yet all over Europe it's the same.  

I'm strangling learning the German language and find out interesting things such as Israel has had bad snow and Jordan had floods via the Tagesschau news channel. I loved that the weather forecast showing central Germany at -12 celsius was delivered in a completely relaxed way where as here we go panic buying if there's a hint of -1.  Also, travelers stranded in a German airport were shown sleeping comfortably on airport supplied camp beds with blankets which makes me think I'd prefer to be stranded there than Heathrow.  The Brits are actually pretty stoical about snow and bad weather but our media love creating a drama out of it. 

All that unexpected time on my hands lead to some extra yoga time (Tara Lee - superb but I'm not showing you photo's of me doing a wobbly tree pose) and some baking thanks to a book I was given for Christmas.
 Here's my version of Mary's lemony swiss roll.  Yummmmm....
In addition to the baking I decided to experiment a bit more with the machine embroidery I was doing last week.  (It's so odd to work in the craft room and hear nothing except my machine whirring away.  The little road outside was so icey none of the usual cars or horse have been out and about.)
And once I'd gained some confidence I made a thing....
I'm hoping to build up to doing writing.  This is a great, fun way to use your machine, especially as an antidote to the strict stitching and accuracy of patchwork!  Hopefully I'll be able to escape the four walls tomorrow because although it's nice to have time home alone, I've had plenty now thanks.

Wednesday, 16 January 2013

Heartfelt Hug

Sometimes sending a card isn't enough and you want to send someone something more huggy.  So this was the chance for me to get stuck into a book I bought before Christmas but didn't have time to read ...Poppy Treffry's (second) book about machine embroidery.  It's a technique we've covered in our sewing classes and it's one I really love, so it was interesting to read the tips and designs in Poppy's book.  She runs classes in Cornwall too but I think you've got to be really quick to snap them up!  (I checked and 2013 is booked already.)


The design which caught my eye was this one for a butterfly.  I didn't follow the instructions exactly but I'm pleased with the result and relieved I finally got the tension right.  That took longer than making the butterfly!  It was always going to be a heart shaped mini cushion and I think the butterfly design was ideal for that shape.
It will be sent to it's new owner later in the week :)


Wednesday, 9 January 2013

January Stillness

January feels very still so far.  It's the usual reaction to Christmas being over, the decoration's being taken down and trying to get back into the work routine.  The  motorway feels very dark and loooong these mornings!  But for me it's mostly still because of not having a project I MUST complete.  I'm working away on my 6 Ball Blanket which I've renamed my Seagreen Blanket but there is no pressure to make anything.  No pressure at all.  I can make what I want in my own time.  It's blissfully calming and I realised I'm crafting for...relaxation.

I promised that I would share the Christmas gifts now they have been opened....
Both are quilts, both made as surprises for the recipients and both (I'm relieved to say) liked by their new owners.  You never quite know when you make something to someone else's taste if you'll get it right but these seemed to work.  Both were made in the evenings over 8 weeks and I must admit, I think I took on a bit too much but that's a lesson learned and I'm going to enjoy the stillness of January and only craft for pleasure this month.  Who knows, I may just get back into doing my yoga in the evenings and not make anything at all!


Monday, 24 December 2012

1 more sleep!!!

I was planning a lazy start to Christmas Eve, y'know the kind of thing, coffee in bed...long shower, leisurely breakfast. So when I woke at 6am and started mentally running through all the nice things I had to do today I couldn't wait to get up and get on...

The coffee pot tea cosy (I need a better name) is now finished. I started it a couple of weeks ago in anticipation of many visitors drinking many coffees and needing to keep the pot warm. And anyway, why does no one make these, you can get tea cosies after all! This is a bit of a prototype and although it would have been easier to make a tall cosy and pop it over the whole thing, I wanted a quilted jacket style of thing. It is a wee bit clumsier than I like but it will do the job for now :)

Next on my tick sheet was this......a slab of millionaire shortbread, ohhhh yeahhhhh! I LOVE this stuff but mostly when you buy it in shops it's dry. The caramel filling should be goooooooey. I used a recipe I found on the back of a carnation condensed milk tin. What? There's a bit missing from the bottom left corner? No, I don't know anything about that. *innocent face*

And bizarrely I've spend a ridiculous amount of time making a thing I've never eaten and have no idea what it should taste like. Pomegranate molasses. Anyone tried it? It's for inclusion in an ottolenghi recipe for another thing I've never eaten called kisir. It's a vegan dish and I liked the sound of it. I'll let you know.....

Oh and one last thing, we've just checked on the Santa Tracker and he's over China. 'Cited!!!


Sunday, 23 December 2012

Twas (nearly) the night before Christmas...

And all through the house.... people were stirring, baking, tasting, list making, tidying etc etc! My preparation is almost complete. The stressful part (moving myself, the presents, the shopping and loads of oven dishes and serving dishes from the town house to the country house for christmas) was done yesterday. Phew. So now I'm installed with himself and the boys, all unpacked and ready to bake and cook and entertain my little heart out for the next 8 days. Because both our jobs take us in different geographical directions and we live apart through the week the only way we ever get this much time together is if we go on holiday!

Below, let me introduce you to Mr Frosty. He was made from wadding and felt at our last sewing class of the year and now sits contentedly looking out of the country house window at all the muffled and scarved people who walk up our lane. (His personalised button was made following the same technique I wrote about in an earlier post.)

Lots of other things were made that I haven't had time to tell you about such as this very tasty, moist vegetarian cashew nut and mushroom loaf. It's taken from a recipe by Sarah Brown who was a new name to me. I'd put in a google search some weeks ago for a nut loaf suitable for a veggie christmas lunch, I've tasted some great ones but never tried making my own. This is the recipe which came up time and again and got many recommendations so, using the power of Amazon, I tracked down the book (Vegetarian Kitchen) containing the recipe and ta dahhhh!!! My intention was to freeze it all but it was soooo good only half made it to the freezer, pre sliced and ready to pop in the oven beside the turkey for the meat eaters.

The silver version of the large Christmas wreath was made for our office decorations with help from everyone but I couldn't get a great pic of it.....It's just photo copy paper and some more newsprint baubles with some silver leaves nestled in the centre. Don't know if we won the "Decoration-Off" challenge with PR yet....

And finally, truffles!!! I will need to do another post later with the recipe because it is GOOD. It's one of those recipes the family use year after year. I've modified the standard sherry truffles this year and created (get me!) The Grand Marnier Truffle. Oh my, but it is gooder than good! And it's a great way to use up that weird shaped bottle of liqueur found hiding at the back of a cupboard. I added orange zest to boost the orange in the booze and yummmmmm. I will post the recipe, promise :)

It's lovely to have a little more time to write! (I'm tucked up in bed while the rest of the household is snoring quietly.) Usually my posts are done in a rush and are very light on words because of that! This is my first Christmas as a blogger and I've enjoyed the inspiration that's come from reading other people's blogs so I hope my small contribution adds to the spiral of ideas swirling around out there. I like reading all your comments so please don't be shy. If anything here has made you go out and create, let me know!


Wednesday, 19 December 2012

Goodie Bag Tutorial

We are hosting loads of family on Boxing Day and all good parties end with goodie bags being given out - don't they?  I love gathering little gifts and sweets and making them into packages you want to peek into.  There will be several children and a couple of teenagers so goodie bags have been prepared!
First, to make your bag take a sheet of paper 12 x 12 inches.  For this make I used a fantastic thick paper from Docrafts Papermania Home for Christmas range. 
Measure out 7 cm along the top and bottom of the sheer.  At the end you'll have 2 cm which will be your glued fold to hold the bag in shape.   Then measure up 4 1/2 cm from the bottom which will form the base of your bag.  Now fold lengthwise along each of the 7 cm blocks and along the width on your 4 1/2 cm line as shown in the picture and cut triangles only up to your 4 1/2 cm fold line.  (It makes it easier to fold later.)
Fold to make the bag shape and glue along that 2 cm overhang.  (I used a ruler inside to give me something to press against.)
 Then fold in the base sections and glue onto each other.
Turn your box around and we'll pay attention to the top.  Take a small doily (or other circle of paper) and mark lines where you want to cut so it isn't wider than the edge of the bag then cut the edges off.  The picture below probably explains that easier!

 Press the edges of the top of the box inwards (like on a milk carton) and punch two holes in the top.  Thread through some christmassy ribbon and tie in a bow. 
My bags have been made to fit the contents.  The little money box below fits perfectly into the 7cm square bag.  (If you want to put a chocolate orange into a bag, mark out a 7 1/2 cm square bag.)
Other itty bitty's to add might include home made lip balms personalised with a printed label for each recipient.
I have been looking for a way to use a gorgeous new stamp I got recently from the inspirational Waltzing Mouse stamps.  It has several verses of the "Twas the night before Christmas" poem so I stamped it onto the reverse white side of a pretty, festive paper and rolled it into a scroll tied with  red twine.
A high street store was selling good fun, huge badges, so one of those went into each bag too along with some miniature sweets with snowmen and reindeers on them.  Sooo gorjuss!
And finally, the bags, all filled and made up ready for distribution.  


Wednesday, 12 December 2012

Christmas Biscuits

I enjoy cooking.  I'm not brilliant at it but I can follow a recipe with confidence. I really enjoy baking for special occasions and using food to create an atmosphere of welcome and indulgence!  I want my guests to feel a little spoiled so because we are hosting family on Boxing Day I want them to leave with a little kitchen gift. Perhaps I should confess now that biscotti  is not the first sweet thing my hand would reach for.  However, a couple of years ago when I was looking for a kitchen gift I could make in advance I found a recipe for Fruity Christmas Biscotti on BBC Good Food's website which would keep for 1 month once made.  Perfect!  And even better, when I presented my biscotti I discovered that I am in a minority and most people love it!   Below is this years finished result made all pretty in jars with labels added.  I actually made these biscuits last weekend but it wasn't until this evening that I made the labels to finish them off ready for you to see! I used some beautiful stamps from Waltzing Mouse.  The set's called Rescue Remedies and the shape matches the Spellbinders Labels 4 dies.  I inked them up with Archival Brilliance Rocket Red just because that's what I had to hand. 
Making this recipe is lovely.  The scents as you mix it are all of Christmas time, mixed spice, dried fruits and fresh orange zest...yummmmm
 Here it is turned into a dough and rolled out ready to place in the oven.  The reds and greens come from the inclusion of dried cherries and pistachio nuts.
And this is part way through the cooking process.  You remove it from the oven while it's still pale, slice it into diagonal strips and re-bake twice.  It's a bit of a faff turning the fiddly little biscuits but worth it!
And once you've done all your hard work, you can relax with a cuppa or a glass of something by candlelight.  This is my festive table decoration: oranges and huge pine cones still on their branches gifted from a friend's garden and placed on a big slate tile acquired when I happened to be in the right place at the right time when my building was re-roofed!  (Scrub your tile, stick a bit of felt underneath and act casual about it.) 

Monday, 10 December 2012

Christmas Wreath

Here's an idea I found on you tube.  It took a couple of evenings to make but is ideal for the town house which is an apartment at the top of an old building and therefore has a front door protected from the weather, perfect for a paper wreath!  I actually made it back in the autumn but had to wait for the seasonal baubles to appear in the shops so I could finish the center piece.  
I finished this one with bronzey baubles because the vintage pages of the book I used had that dull, slightly yellow tinge to them that all the best old books have.  However, at work we have a competition with some colleagues in another department for who can produce the best decorations. So some of us are quietly making these paper twirls and hiding them in our drawers (of the filing variety!) ready to assemble by the end of this week and this weekend I made some more of the newsprint baubles I posted about a few days ago so it will be a silver wreath.  I'll post pics once it's finished :)
In the meantime, if you have time - this is a very satisfying make and the scale of the finished wreath is big enough for you to feel you've made something worthwhile with a big TA DAHHH factor!


Wednesday, 5 December 2012

Newsprint Baubles

Yeay!!! I'm back after a business trip abroad (well, Scotland) and a nasty lurgy. But now thanks to extreme medication (lemsip) and 2 weeks sick leave, it's back to blogging the good stuff and with Christmas just around the corner there's plenty of it!

There's quite a lot I can't show you in case it's seen by those who will be receiving it but I promise I'll share after the gifts have been unwrapped!  In the meantime there are any number of cheery little winter ideas....

Here's one inspired by a picture I saw on Pinterest....

 Sweet aren't they?  And easy to make....
Get a plastic bauble and paint it white, then cover it with glue, then cover it with torn pieces of newsprint or pieces from an old book.  Anything with text on it really.  If you have some, paint the whole thing with decoupage sealer/glue.
 You may want to make a bit of a feature of the top of the bauble.  If so dip it in glue then dip it in glitter then spend the next two days finding glitter in places where nothing should shine.
Print a little Christmassy message on plain kraft card, punch a hole in it and tie a pretty bow with some twine or whatever you have to hand. 
Ta dah!!


Sunday, 28 October 2012

Personalised Buttons Tutorial

The end of October is always a special time. It's when the boys take themselves off for a long weekend to a coastal destination in Devon to do what boys do....lose money in penny arcades, eat fish and chips, watch Rambo DVD's and have some quality Daddy and boy time.  And I get to craft my little heart out!  A whole weekend alone in the Week Day home is...blissful, although I don't think I'd like it every weekend!

This weekend I ticked a whole load of projects off my "to do" list including making my third mouse in as many months but this was a special request to be given as a Christmas present and I am pretty quick at making these now!
But the reason for showing you this is to focus on the buttons.  These have been personalised for the recipient.  They're not made of cardboard, they're made of plastic and below is a tutorial to show you what you'll need and how to do this  :)
You'll need some of this stuff - shrink plastic.  You can get it in good craft shops or online without difficulty.  You will also need a craft heat gun, a hairdryer just won't be hot enough! 
You also need the items below - a craft mat is useful but not critical, a large hole punch, although you can of course cut by hand, a permanent market pen and if you don't have a cropadile, use a standard file hole punch.
 Punch out a couple of practice circles so you can try writing what you want to get the spacing right, then commit to the plastic!
Punch 4 holes in your practice circles to make sure they're positioned correctly and use it as a template on your plastic version.
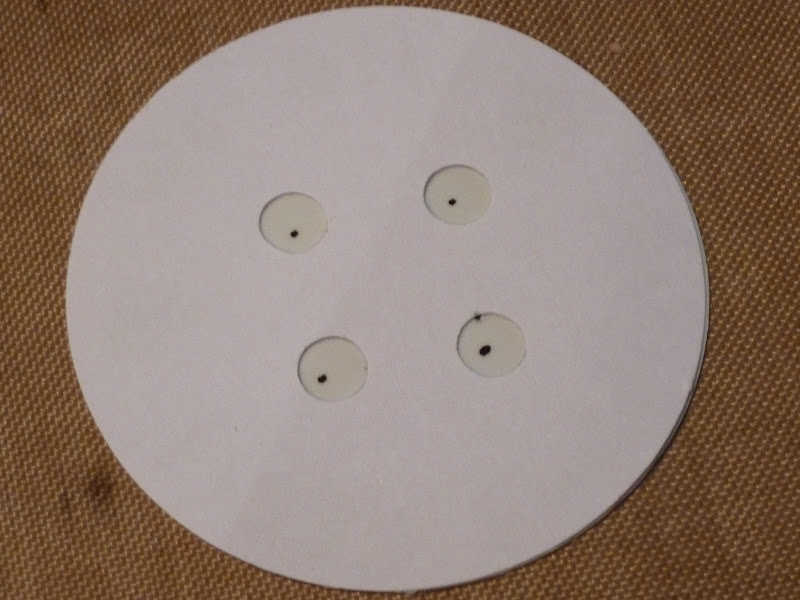
 Use the permanent pen and dot where you'll use the hole punch.
 The punch the holes and get your heating tool.
As you heat the circle it will twist and turn but don't panic, it will melt back to it's original shape.
Nearly finished....
Done!  And here's the finished version next to the original size.  It shrinks to about 7 times the original, becomes thicker and finally cools enough for you to handle.
You can make all kinds of personalised buttons using someone's name, the date of their birthday perhaps or a seasonal phrase.  If you want to use a rubber stamps, use StazOn ink, cut out and shrink.  There are a couple of examples below shown in their original stamped size and shrunken.  You can colour it with pencils but be aware that the colour will darken as the object shrinks so start off very lightly.