Wednesday, 19 December 2012

Goodie Bag Tutorial

We are hosting loads of family on Boxing Day and all good parties end with goodie bags being given out - don't they?  I love gathering little gifts and sweets and making them into packages you want to peek into.  There will be several children and a couple of teenagers so goodie bags have been prepared!
First, to make your bag take a sheet of paper 12 x 12 inches.  For this make I used a fantastic thick paper from Docrafts Papermania Home for Christmas range. 
Measure out 7 cm along the top and bottom of the sheer.  At the end you'll have 2 cm which will be your glued fold to hold the bag in shape.   Then measure up 4 1/2 cm from the bottom which will form the base of your bag.  Now fold lengthwise along each of the 7 cm blocks and along the width on your 4 1/2 cm line as shown in the picture and cut triangles only up to your 4 1/2 cm fold line.  (It makes it easier to fold later.)
Fold to make the bag shape and glue along that 2 cm overhang.  (I used a ruler inside to give me something to press against.)
 Then fold in the base sections and glue onto each other.
Turn your box around and we'll pay attention to the top.  Take a small doily (or other circle of paper) and mark lines where you want to cut so it isn't wider than the edge of the bag then cut the edges off.  The picture below probably explains that easier!

 Press the edges of the top of the box inwards (like on a milk carton) and punch two holes in the top.  Thread through some christmassy ribbon and tie in a bow. 
My bags have been made to fit the contents.  The little money box below fits perfectly into the 7cm square bag.  (If you want to put a chocolate orange into a bag, mark out a 7 1/2 cm square bag.)
Other itty bitty's to add might include home made lip balms personalised with a printed label for each recipient.
I have been looking for a way to use a gorgeous new stamp I got recently from the inspirational Waltzing Mouse stamps.  It has several verses of the "Twas the night before Christmas" poem so I stamped it onto the reverse white side of a pretty, festive paper and rolled it into a scroll tied with  red twine.
A high street store was selling good fun, huge badges, so one of those went into each bag too along with some miniature sweets with snowmen and reindeers on them.  Sooo gorjuss!
And finally, the bags, all filled and made up ready for distribution.  


Wednesday, 12 December 2012

Christmas Biscuits

I enjoy cooking.  I'm not brilliant at it but I can follow a recipe with confidence. I really enjoy baking for special occasions and using food to create an atmosphere of welcome and indulgence!  I want my guests to feel a little spoiled so because we are hosting family on Boxing Day I want them to leave with a little kitchen gift. Perhaps I should confess now that biscotti  is not the first sweet thing my hand would reach for.  However, a couple of years ago when I was looking for a kitchen gift I could make in advance I found a recipe for Fruity Christmas Biscotti on BBC Good Food's website which would keep for 1 month once made.  Perfect!  And even better, when I presented my biscotti I discovered that I am in a minority and most people love it!   Below is this years finished result made all pretty in jars with labels added.  I actually made these biscuits last weekend but it wasn't until this evening that I made the labels to finish them off ready for you to see! I used some beautiful stamps from Waltzing Mouse.  The set's called Rescue Remedies and the shape matches the Spellbinders Labels 4 dies.  I inked them up with Archival Brilliance Rocket Red just because that's what I had to hand. 
Making this recipe is lovely.  The scents as you mix it are all of Christmas time, mixed spice, dried fruits and fresh orange zest...yummmmm
 Here it is turned into a dough and rolled out ready to place in the oven.  The reds and greens come from the inclusion of dried cherries and pistachio nuts.
And this is part way through the cooking process.  You remove it from the oven while it's still pale, slice it into diagonal strips and re-bake twice.  It's a bit of a faff turning the fiddly little biscuits but worth it!
And once you've done all your hard work, you can relax with a cuppa or a glass of something by candlelight.  This is my festive table decoration: oranges and huge pine cones still on their branches gifted from a friend's garden and placed on a big slate tile acquired when I happened to be in the right place at the right time when my building was re-roofed!  (Scrub your tile, stick a bit of felt underneath and act casual about it.) 

Monday, 10 December 2012

Christmas Wreath

Here's an idea I found on you tube.  It took a couple of evenings to make but is ideal for the town house which is an apartment at the top of an old building and therefore has a front door protected from the weather, perfect for a paper wreath!  I actually made it back in the autumn but had to wait for the seasonal baubles to appear in the shops so I could finish the center piece.  
I finished this one with bronzey baubles because the vintage pages of the book I used had that dull, slightly yellow tinge to them that all the best old books have.  However, at work we have a competition with some colleagues in another department for who can produce the best decorations. So some of us are quietly making these paper twirls and hiding them in our drawers (of the filing variety!) ready to assemble by the end of this week and this weekend I made some more of the newsprint baubles I posted about a few days ago so it will be a silver wreath.  I'll post pics once it's finished :)
In the meantime, if you have time - this is a very satisfying make and the scale of the finished wreath is big enough for you to feel you've made something worthwhile with a big TA DAHHH factor!


Wednesday, 5 December 2012

Newsprint Baubles

Yeay!!! I'm back after a business trip abroad (well, Scotland) and a nasty lurgy. But now thanks to extreme medication (lemsip) and 2 weeks sick leave, it's back to blogging the good stuff and with Christmas just around the corner there's plenty of it!

There's quite a lot I can't show you in case it's seen by those who will be receiving it but I promise I'll share after the gifts have been unwrapped!  In the meantime there are any number of cheery little winter ideas....

Here's one inspired by a picture I saw on Pinterest....

 Sweet aren't they?  And easy to make....
Get a plastic bauble and paint it white, then cover it with glue, then cover it with torn pieces of newsprint or pieces from an old book.  Anything with text on it really.  If you have some, paint the whole thing with decoupage sealer/glue.
 You may want to make a bit of a feature of the top of the bauble.  If so dip it in glue then dip it in glitter then spend the next two days finding glitter in places where nothing should shine.
Print a little Christmassy message on plain kraft card, punch a hole in it and tie a pretty bow with some twine or whatever you have to hand. 
Ta dah!!


Sunday, 28 October 2012

Personalised Buttons Tutorial

The end of October is always a special time. It's when the boys take themselves off for a long weekend to a coastal destination in Devon to do what boys do....lose money in penny arcades, eat fish and chips, watch Rambo DVD's and have some quality Daddy and boy time.  And I get to craft my little heart out!  A whole weekend alone in the Week Day home is...blissful, although I don't think I'd like it every weekend!

This weekend I ticked a whole load of projects off my "to do" list including making my third mouse in as many months but this was a special request to be given as a Christmas present and I am pretty quick at making these now!
But the reason for showing you this is to focus on the buttons.  These have been personalised for the recipient.  They're not made of cardboard, they're made of plastic and below is a tutorial to show you what you'll need and how to do this  :)
You'll need some of this stuff - shrink plastic.  You can get it in good craft shops or online without difficulty.  You will also need a craft heat gun, a hairdryer just won't be hot enough! 
You also need the items below - a craft mat is useful but not critical, a large hole punch, although you can of course cut by hand, a permanent market pen and if you don't have a cropadile, use a standard file hole punch.
 Punch out a couple of practice circles so you can try writing what you want to get the spacing right, then commit to the plastic!
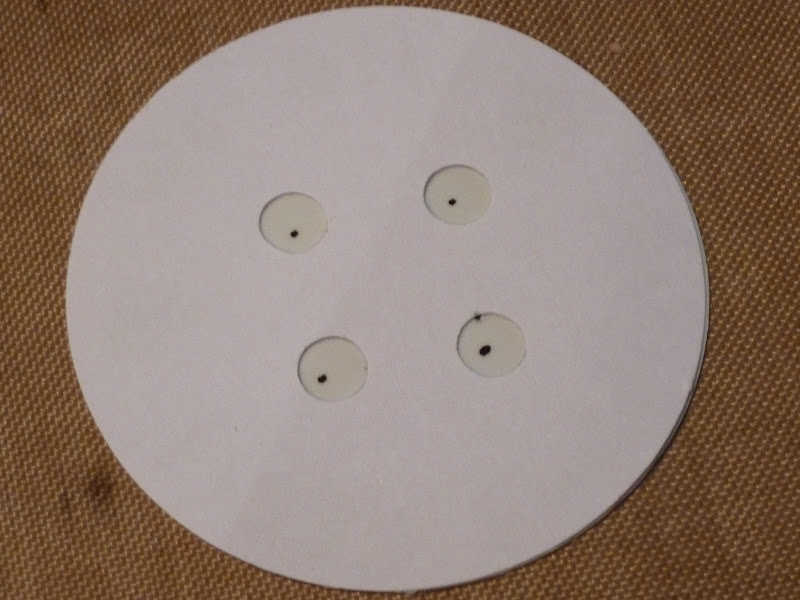
Punch 4 holes in your practice circles to make sure they're positioned correctly and use it as a template on your plastic version.
 Use the permanent pen and dot where you'll use the hole punch.
 The punch the holes and get your heating tool.
As you heat the circle it will twist and turn but don't panic, it will melt back to it's original shape.
Nearly finished....
Done!  And here's the finished version next to the original size.  It shrinks to about 7 times the original, becomes thicker and finally cools enough for you to handle.
You can make all kinds of personalised buttons using someone's name, the date of their birthday perhaps or a seasonal phrase.  If you want to use a rubber stamps, use StazOn ink, cut out and shrink.  There are a couple of examples below shown in their original stamped size and shrunken.  You can colour it with pencils but be aware that the colour will darken as the object shrinks so start off very lightly.


Saturday, 20 October 2012

Festive Card Bunting Tutorial

Maybe I should just get this out of the way, fess up and admit I absolutely LOVE Christmas!  That's not to say I think it should be everyday of the year, that would rob it of it's specialness and also I doubt even I could be bothered with that.  But what better way to deal with the shortening days and the coldness that steals your breath than with a great big party around the darkest time of the year just at the point when you are gagging for happy times!

That said, I prefer to keep my festive season in December.  However...some months ago, I promised the ladies at Paperarts that I would make them a "thing" to stick on their wall and as summer has passed (that was summer?) and we're drifting into a different season I thought I would make them something appropriate. I was also feeling guilty about not having kept my word until now!  So last night, instead of keeping up to date with my German studies (Ich habe Deutsch gelernt fur zwei Jahre), I played with some punches, card and liquid dots...

Cut some banner shaped triangles 5 inches long and 3 inches wide at the widest part and decorate with a christmassy style stamp and emboss. Punch whatever leafy shape you may have.  I cut mine in half and glued to the back of my triangle.  Using a green ink dye (I used Ranger Earthtones, Lettuce) smudge some dark patches over the leaves only to make it more visually interesting.  

I used another punch to make the row of holes in the red card for threading later but you could take a length of card and pop holes with a hole punch or pokey tool. Print off a favourite carol or some festive words onto plain white paper and colour lightly with your green ink.  Cut out and attach to the embossed triangles.  

Blob ruby red liquid pearls at the base of the leaves to look like berries. While that's drying, make yourself some flowers using the Scrunchy Flower Tutorial and cut or punch some holly leaves to stick underneath.  (This project is horticulturally all wrong!)  Use a pokey tool to make a little hole where you want the flower to sit and glue the leaves around the hole before you attach the flower.  Push the wings of the paper fastener through the hole and open the wings at the back of the triangle banner to secure the flower in place.  

Tip - if you're going to use glitter spray or anything on your flowers, do it before you attach the flower.  Don't attach it and think, "Oh I know, I'll just give that a little spray with some glimmer mist", because you and I both know that will cause the ink on the strips of words to smudge and you'll have to re-print, re-colour and re-stick.  I make all the mistakes so you don't have to!
Glue on the strip of card with the holes and thread through beads and cord to make a banner.  All together I made 11 banners but it's too long to photograph and show you so here's a section.  I didn't put flowers on each banner, I only made about 7 of them.  Ta dahhh....
You can adapt this to fit whatever colours, card, punches you have.  Before settling on these colours I also experimented with green and silver ('cos I had silver liquid pearls) and that looked really good too, I may make that for myself.

Sunday, 14 October 2012

Mud Running

Today was the annual local mud run so we walked from the country house to the cricket ground and got signed up. (I didn't run because someone has to hold the jumpers and take the photos.) After some horrible wet weather yesterday, this morning brought clear blue skies and strong sunshine. Only a cold wind reminded us that we are drifting gently into winter.

The boys ran off somewhere while I took my camera fingers through a thorough warm up and stretch.

The full race is a pretty gruelling 11km slog across soggy, boggy, wet fields and lanes. Once the main race had been started and everyone had disappeared in a schlep of lycra, the 2km mini fun run got underway. No 1 child returned 14 mins later in about 35th position and child number 2 skidded in about a minute after. Both did very well and naturally we had to take pics of the medal. This was the moment I had trained for after all.

They took their muddy little selves off to look out for Super Dad and watch the end of the race. Once again family pride runs high with all boys taking on the challenge and winning even if they didn't win, if you see what I mean.


It took a mammoth shower session before they were all clean enough to be taken to the local pub and fed a huge Sunday lunch. My nose has only just thawed out!


Friday, 5 October 2012

Mouse Mat

Our sewing teacher gave us all a summer challenge a few weeks ago.  She sent us a few small pieces of fabric and we had to make a quilty thing using each of the fabrics and were allowed to add one additional fabric.  I was on a bit of a mouse roll at the time so decided to interpret the challenge in such as way as I got to make another mouse. so here is my "mouse mat".  The quilting is sneakily added in the quilt the mouse is sitting on.  I've just realised I've added buttons.  Ummm... I don't think that was in the brief so don't tell anyone 'kay?
In other news, it's autumn here and I've got the photographic evidence...
 ...and we had a fabby full moon last weekend.  It's a cracker isn't it? 
I played about with my camera settings and ended up with something which looks either like an Alpine mountain (rather than the stone wall it actually is) or a painting.  I like it.


Friday, 28 September 2012

Biscuits for Macmillan!

Morning!  It's an early blog this morning as I and my work colleagues pack up our cakes, biscuits, flapjacks and bakes for the fund raising Coffee Morning for Macmillan's Cancer Support.  In addition to the mouse I've made some empire biscuits stuffed with delicious strawberry jam, iced and half a glace cherry blobbed on top.  I don't think we'll be needing breakfast today!  There's also the promise of a Celebrity Baker from The Great British Bake Off, a hugely popular programme here in the UK so all us amateur bakers are pretty excited about that too.  And it's Friday!  Does it get any better?!


Saturday, 22 September 2012

A Mouse for Macmillan

The company I work for is a big supporter of Macmillan Cancer Support and we all look forward to the annual Coffee Morning which gives us an excuse to eat more cake than is good for us!  This year however, we were talking about different things we could do apart from bake and eat.  As a result, some of my (male?) colleagues will be getting waxed in exchange for hard cash.  It's in a good cause.  That's what we've told them.
My contribution is a mouse.  I'm not entirely sure why and I'll bake something too but we're going to raffle the mouse and hopefully it will raise a smile too :)
The pattern for the mouse came from this rather wonderful book by Tone Finnanger.  I've made several things from it and they've all turned out well.  Now I'm almost at the stage of needing to hold my book together with sellotape it's so well used.

I wanted to let the recipient know this was handmade, therefore I needed a label and found an idea somewhere on the internet to use fray check for hemlines and decided to adapt it.  Print what you want onto photo fabric.  Allow it to dry then cut out.   
Gloop fray check around the edges and leave to dry.  
 Fold your label in half and sew into a discreet area of your handmade item.  (In this case under the dress of the mouse.)  Ta dahhhh....


In Search of Richard III


Richard III

As well as crafting, I like history and I've always felt the Tudors were too keen to turn Richard III into a monster so since my late teens I've rejected the Shakespeare villain and read as much about all sides of the argument as I could.  (If you like an academic approach visit the pages of the Richard III Society or if you prefer a well researched novel read Josephine Tey's Daughter of Time.)  
And now there have been exciting developments in a car park in Leicester!  If you watch the recent press conference the archaeologists look pretty excited about what they've found and despite the cautious words and warnings about scientific testing those guys are grinning like crazy and BUZZING!!
Now I am a bit biased but I've been wondering what would have happened if Richard hadn't died in 1485 but had defeated the real usurper, Henry Tudor, and won the Battle at Bosworth....

We wouldn't have had the unlovely Tudors who ruthlessly and efficiently removed all opposition  including Margaret the Duchess of Salisbury and niece of Richard who at the age of 72 was sent to a messy execution at the hands of an inexperienced and clumsy axe man.  Perhaps England would have remained a Catholic country and preserved both it's religious houses and the treasures stored within them,  treasures denied to us now having been destroyed by the greed of Henry VIII.  Without a crown on his head he wouldn't have  been in a position to make 6 women miserable and 2 of them headless. Shakespeare would not have written his history plays in quite the same way and we would have been spared hearing "Now is the winter of our discontent etc" delivered in bizarre tones by actors who should know better, dragging themselves across a stage like smacked spiders. Nor would there be a state in America named Virginia.

Mary Queen of Scots may have managed to live out her inevitable exile without ending with her neck on a block, her son would not have inherited the crowns of Scotland and England and her grandson would not have had his head chopped off by Cromwell who would have been remembered for being a conscientious Huntingdon MP with no need to create a new model army to fight a king.  With no restoration we may have lost some exuberant and bawdy plays but I like to think Nell Gwyn's charms would have worked on whichever King occupied the throne at that time!

If the Stuarts had stayed north of the border, there may never had been an act of union between England and Scotland and our flag would look quite different. Perhaps the slaughter of Culloden and the systematic destruction of the Gaelic culture would never have happened.

We would have avoided the Georgians although the first elector of Hanover would have still imprisoned his first wife for 30 years in Castle Ahlden, the third George would still have been known as a mad man instead of an ill man and his son would still have grown fat on food and poor on gambling. But he would have had no Parliament to pay his debts!  Parliament may not have developed in the way it did had it not seen the chance to take greater control into it's hands under a new and reluctant German king. We would have been spared Victoria and her endless monuments but would have lost out on the enterprise and energy of Albert. Without Victoria's grandchildren in charge of Europe, would there have been a 1st World War?  And if Alexei Nikolaevich had not inherited haemophilia from his gloomy granny could Rasputin have held such influence and would Russia have kept it's Tsar? Communism could have been a footnote in history and the nations would have had to find other reasons to argue with each other. Is it conceivable that a 2nd World War could have happened without the first?


How exciting if the bones in a Leicestershire car park are finally proved to be those of the last Plantagenet king of England!  And what a pointless but curious way to while away time playing the "what if" game of history.   And...if it is Richard...can we have an extra bank holiday in 2013 for his state funeral please?!