Showing posts with label Tutorial. Show all posts

Sunday, 9 October 2016

Shabby Chic Kraft Tex Notebook Tutorial

Have you heard of Kraft Tex?  No me neither until recently.  It's a paper based material which reacts like leather.  Apparently those tags on the back of jeans are made from it.  You can paint, punch, emboss, stamp, iron, stitch, wash and crumple it.  It's just what I've been looking for to create notebooks of a size and shape I want without having to buy a notebook and then alter it.  I bought mine from Amazon and the size is 19" wide by 1.5 yards long so plenty to play with.  And yes, you can cut it with the Brother Scan and Cut.  I used a standard blade set at 12, speed 5 and pressure of 1.  There are sooooo many possibilities and I started with a shabby chic style notebook.
It started as an A5 piece.  I folded the right hand edge in 1 1/4 inches to make a seal over the main cover.  You'll see in the video below how I made the fastening and attached the lace on the front cover.  By the way, the video is badged up as www.atticlane.com.  That's because after 2 months of frustration trying to move the domain to a new host, the transfer has gone ahead and soon I'll be launching the new website!  There are a few more tweaks to make but hopefully in the next month it will go live!!


Wednesday, 21 September 2016

Picasso Doodles

I saw this small metal stencil used on some You Tube videos and having tracked it down, bought one.  It's by Stampendous and is called "Picasso".  I've had a good old mess about with it and really like the wave shapes and curves.  They're the shapes I'm not good at!
I grabbed a piece of card and started playing and didn't stop.  It turned into a Zentangle inspired background but it needed something simple on top.  So I cut some pink flowers, matted them on some darker pink which matched the pink mat on the back of the whole card.  I made some massive dots for the centre of the flowers using some fabby nuvo cystals which dome beautifully and dry hard and voila!  I enjoyed it so much, I made two!
Doodle any shapes you like in the spaces and if you want inspiration, google "Zentangle" and you'll find loads of ideas.
Below you can see the lovely dome of the Nuvo Crystals.
 Card number 2...
Enjoy the video :)

Monday, 19 September 2016

The Book of Layers

This book was a commission and it grew out of a tag I shared on  my blog www.weekdayhome.blogspot.co.uk.  I've called it the Book of Layers because as you will see it is made of loads and loads of layers!    The antiquing creams used are designed to be applied, dried and wiped back to expose the colours below.  If you then seal that layer, it will protect your work below and you can continue adding colours and wiping back.  
 The end effect is one of a book looking aged and worn.  It's hard to remember this is just card.

All the details of how to make the layers and the paints, creams and waxes used are listed in the video below.  Enjoy :)

Sunday, 11 September 2016

Fallen Leaves Background - Mixed Media Tag

This is a very quick little tag I made using some the the lovely Fresco Paints from Paperartsy, a cut out tree I found as an SVG file for the Brother Scan and Cut (although I would have used a bare tree branch stamp if I'd had one) and some Nuvo gold paste through a leafy stencil.  The idea was to focus on creating a background using a palette knife instead of a brush to apply paint.
In this tag I blobbed 4 different colours of paint directly onto the card including one very light and one quite dark to give range and depth.  You can mix it up as much as you like but the less you move it around, the more "blocky" the paint will appear.  In the first sample below, I used the same colours as above but worked them a little more.


These samples use different colours just to show you the varying effects you can get.


I love that blue and silver.  I need to use that in a project!!
Here's the video showing my twirly palette knife style....Enjoy!

Friday, 9 September 2016

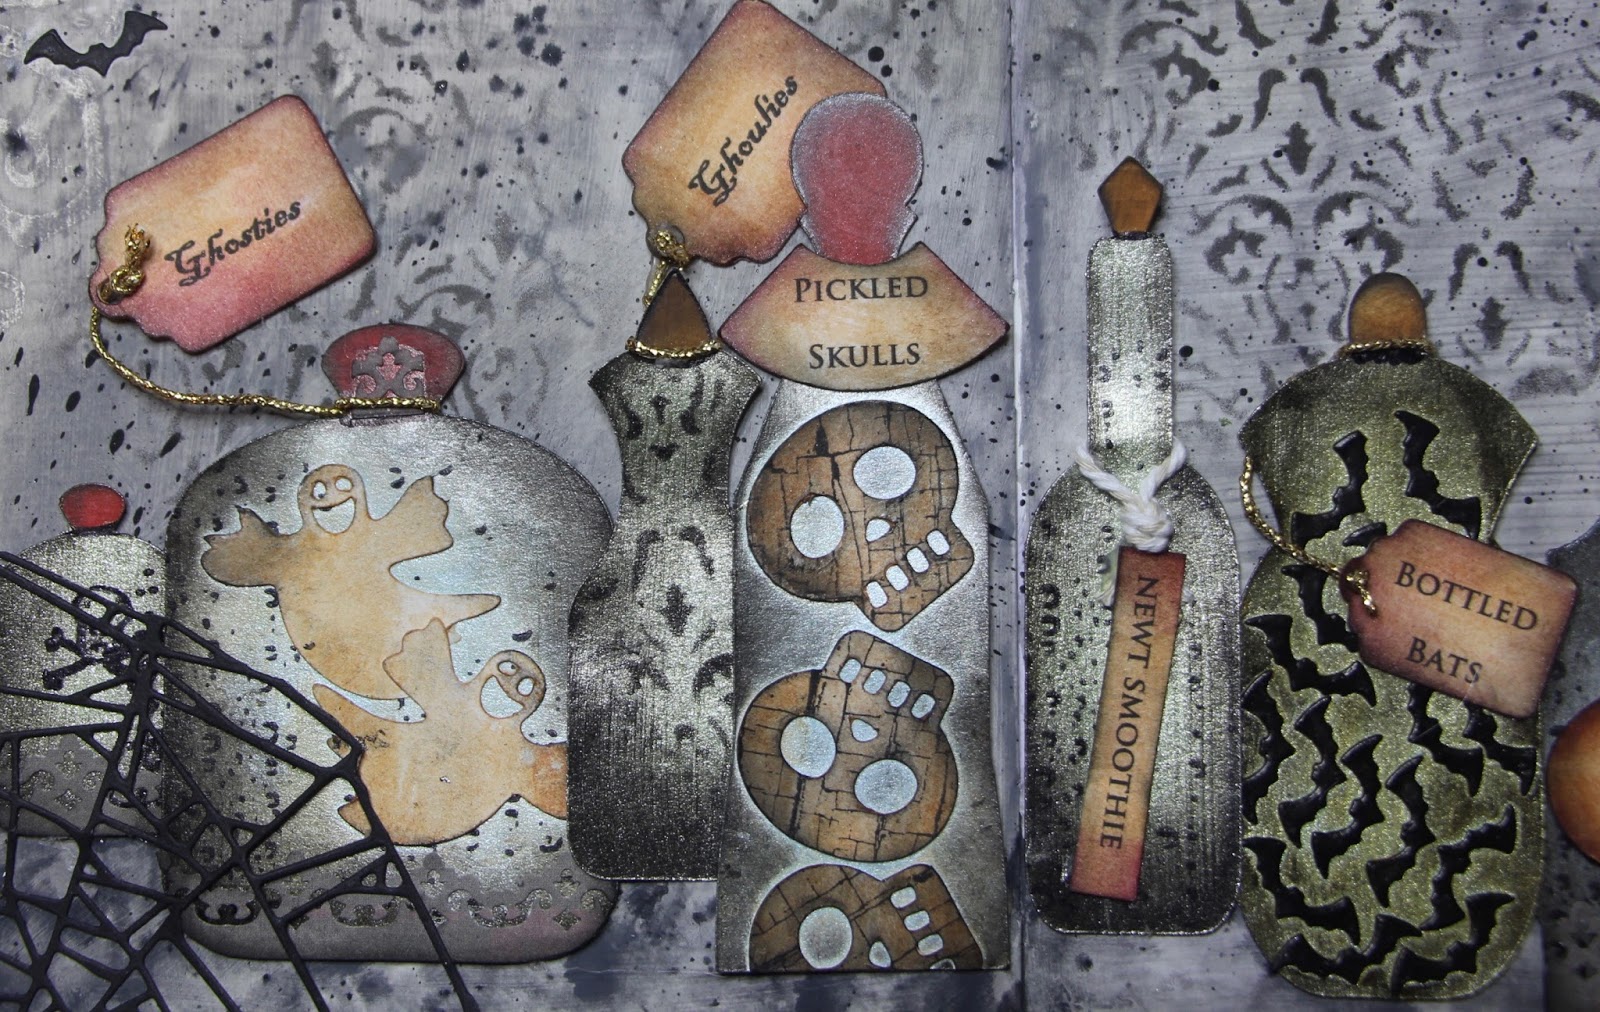
Spooky Alchemy - with free bottle shapes

In this mixed media page I'm tapping into the imagery I associate with mad professors in underground laboratories.  Too specific?  Perhaps.  I think the result has a Victorian feel to it, perhaps due to the effect of the black ornate stencilling in the centre of the background.  I used a wide range of techniques here including die cutting, stamping, stencilling, resist, hand drawn bottles etc.  It also took half the weekend to finish, one of my longest projects but it's always rewarding when you translate the picture in your head to a completed piece so it was worth it.  I've updated this page as a result of a request for a copy of my bottles used on this page and you'll find them with a couple of labels at the end of this post.  


The paints used for the bottles are from a range by Imagination Crafts called Starlights and they provided exactly the glow I wanted from the bottles.  When first applied, I was worried it was too bright but once I'd inked the edges of the bottles it gave the perfect effect!
The glow effect shows up especially well in the bottle of Pickled Skulls, making it appear luminous.
I trimmed this video as much as I thought I could get away with while still showing all the techniques used.  Grab a cuppa and enjoy the video :)

On my You Tube channel (Attic Lane) one of my visitors there asked if I had my bottles available as a pdf.  I don't but I've had a pootle about on the PC and managed to make the bottles a jpg.  I'm more than happy to share (and I hope the file below works as a simple copy and paste) but if you use them anywhere please credit and link back to my blog please.  :)


Monday, 29 August 2016

One stamp - 3 uses

As the colours of the landscape drift into olive, cinnamon and apricot, I want to use those colours in all my projects at the moment.  Because I wanted to focus on the colours rather than the stamp, I took one stamp and used it in a different way in each of the three cards below.  The first features my favourite way of applying gold!  The effect is like gilding and shimmers beautifully.  The background uses two colours of brusho pigmented powders and the video at the end shows how.
 The finished card was layered onto a really thin border of red, then onto gold mire card.
 See the shiney!

The second card was an experiment.  I used a Brother scan and cut to scan in the black stamped image.  Then, I expanded it slightly and cut it out for use as a stencil to puff distress pen inks through.  A flower made up of some shapes left over from other projects completed the card.

Finally, I took the stencil and brayered some gorgeous shimmery paints over it.  It was then layered onto some plain while card to really set off the colours and I added a happy birthday sentiment created in word art and printed onto plain card.  I ran this through the scan and cut and cut out the scalloped circle twice, once round the sentiment and once a little larger from gold mirri card.

Enjoy the video - it's packed with techniques!


Wednesday, 24 August 2016

Autumn Wreath

We're not quite in autumn yet but those soft colours are beginning to creep into the landscape and leaves.  For this project, I've used a Tim Holtz die called Tattered Leaves but you can hand cut your own shapes.  Fold a piece of card in half and draw half a leaf shape with the fold as the centre of the leaf.  Cut and voila!  Colour the edges of the leaves and roll the edges round a paint brush to make them curl in a leafy way.  Cut out a circle from strong card and get your glue gun going.  Add any embellishments you happened to have, raffia would have made a perfect bow on this but I couldn't find mine.
 The video shows you how to make those berry like clusters as well as the whole wreath.  Hang it somewhere you can enjoy it as the nights lengthen.

Monday, 22 August 2016

Altered Vintage Pot

My excuse for even having this plastic pot in the house is that it was on offer :)  Once it had been thoroughly emptied (sob) and was heading for the recycling, I thought what a shame it was to throw it because the shape was perfectly sturdy and practical.  But I'm not a one for shouty marketing and this was too loud even to be relocated to the shed.  (Is it just me who feels the urge to argue back with marketing slogans or ridiculous claims on inanimate objects?) I was standing beside the kitchen roll while having these deep thoughts and a little light bulb went "ping" in my head.  Why not turn the nasty pot into a nice pot?

The kitchen roll played a critical part as you will see in the video below and meant I could cock a happy snook at some nonsense on one of the craft channels selling a gloop and fabric set so you can make fairy houses.  Really?  Am I a princess?  Am I a diddy fairy girl?  And while we're on the subject, it's not "Fairy Dust" it's Brusho's and it's been around for over 30 years.  Just because I craft don't treat me like a poppet.  You're welcome. 

Where were we?  Oh yes, one square of kitchen roll and a decoupage type of glue is all you need to give your pot coverage and texture.  (Look, if you want to make a fairy house that's actually completely fine, just please don't think you need someone else's special kit to do it, mwah x!) 

 Once again, a project using my trademark water sprayed, scrunched, dried and painted flower stacks.  But this time edged with a clear embossing ink pen and a little gold embossing powder added to give the edges of leaves and flowers some definition.
I used a product called "Rusty Patina" because I had it in my stash and wanted to try it out but you don't need it.  Once the kitchen roll and glue is dry, paint over with whatever type of ink/paint you have.
See video for kitchen roll and glue in action!

Wednesday, 3 August 2016

Simple Layered Greetings Card

Yes this this made using the same doily style die cut as in this post but it's such a lovely design I couldn't resist using it again but in softer shades.  The video shows how to ink the edges to give a slight aged or distressed look.  Often I see this used to really darken projects down and it's a balance between using just enough to keep the lightness and drifting into grunge.  As ever, my go-to tools are the rangers distress inks scribbled onto a craft mat and a bit of foam on a stick to mop up the colour and smudge the edges.  If you want a clear line on the edge, use an ink pad directly onto your project.

And here's the video...


Monday, 1 August 2016

Paris (Is worth a mass)

This is an art journal layout I've had in my head for a few weeks and uses some of my favourite things - beautiful stamps from Carabelle, brushos and a white pen.  The quote is from the protestant Henri of Navarre (geek fact.... 1553 - 1610) who is reputed to have said "Paris is Worth a Mass" when advised he would only be accepted as King Henri IV of France if he became catholic.  He converted and became one of France's top kings.

I love the detail in these stamps and how much you can get from the single stamp that makes up this Paris scene.
The full view.
And the video....


Saturday, 30 July 2016

Sunflower - mixed media tag

There's a barley field near us and at this time of the year it's like golden waves lapping against the sky.   It looked, smelled, felt and sounded like summer.  I have a beautiful sunflower stamp and as I walked our puppy down the lane beside the field, this tag took shape in my mind.  I had no particular words to go with the images and didn't want to crowd the design with them so they are kept to one side, leaving the rest of the images to carry the message of a straw textured summer.

Even looking at this again makes me think of straw coloured sunny days!


If you shade around the outside of images which are backed onto white card, it makes them pop more.  The video shows how....


Tuesday, 26 July 2016

Gilded Tag

There are many ways to achieve a gilded effect on card.   You can buy golden mirror card or one of the hot foiling tools on the market.  Although I've been tempted down the hot foiling route, this method serves me well and in this video I show what I use to get the gilded effect.  I also share a technique for creating exactly the colour of flat backed embellishments to suit your project.  It's at the end of the video and requires only a craft heat gun and glue gun.  No expensive machines or foil!
The quote is by Francis Bacon and is also the title of what is probably Josephine Tey's best known book "The Daughter of Time",  a brilliant dissection of the historical lassitude that accepts the Tudor rendition of Richard III as a usurper and nephew murderer.  He wasn't.  

....and back on Planet Craft...see the gold blob in the pic below?  You can make that. 


Sunday, 24 July 2016

Greetings Cards x 2 using kraft and patterned paper

I seem to have got myself in a frugal crafting groove after the past couple of posts!  In all my projects I'm mindful that stamps and die cuts can made projects seem very prescriptive.  But just use it as a launch pad for your creations.  Or sit back with a cup of tea and watch the videos.  There are always plenty of techniques snuck in there!  So here's the first card, it's made with two die cut doilies layered on top of each other and a bit of jooosh in the centre.  (Or - flat backed bead - for those who prefer real words.)  What's nice about this card is that there are only 2 types of card used, one plain and one patterned.  I've never had a whole load of patterned paper in my stash.  I find solid block colour cardstock much more useful and use more kraft, white and cream than any other colours.
I also like generic cards which are suitable for anything and any gender.
 This second card is very simple and is just two layers finished off with one of the handmade flowers from this post.  The sentiment is hand written and can be adapted to suit the occasion.  It was added here to show you how I might have finished the card off.  Generally I have a few of these type of cards made up, ready to have a sentiment added when I've forgotten people's birthdays for example!

Grab that cuppa.  Here's the video.